Sound

In Breathing LED you held the frequency still and changed the duty cycle. Now flip it around: hold the duty cycle still and change the frequency — and a piezo buzzer turns those pulses into sound. By the end, your board plays a melody.
About 30 minutes.
What you'll learn
- How a piezo buzzer turns pulses into sound
- Why frequency is pitch
- How musical notes map to frequencies, and how to play a melody from arrays
- Why the buzzer gets a PWM controller all to itself
What you'll need
- From the kit:
- Piezo buzzer
- Jumper wires
- The RGB LEDs wiring can stay in place — the buzzer uses a different pin
Pin reference
| Connection | FEZ Flea | FEZ Bit |
|---|---|---|
| Buzzer + | PB8 — PWM controller 16 | P2 — PWM controller 5 |
| Buzzer − | GND | GND |
Why this pin?
From RGB LEDs: every channel on a PWM controller shares one frequency. A buzzer's frequency is its pitch — so a buzzer on a shared controller would drag every other channel along with each note it plays.
These pins are the only channel on their controller, so the buzzer can change frequency freely without touching anything else.
The FEZ Bit also has a buzzer on the board — FEZBit.Timer.Pwm.Controller3.Buzzer. It's on controller 3, the same controller as P0, P1, and P3 from the RGB LEDs lesson. Play a note on it, and those pins change frequency too. That's harmless for LEDs, but not for anything that needs a steady frequency — like the servo in the next lesson.
Step 1 — Create the project
Create a new TinyCLR Application project and install the GHIElectronics.TinyCLR.Devices.Pwm and GHIElectronics.TinyCLR.Pins NuGet packages.
Need the steps? Start Here covers creating a project and deploying.
Step 2 — Wire the buzzer
A piezo buzzer draws very little current, so it connects straight to the pin — no resistor needed.
With USB unplugged:
- FEZ Flea
- FEZ Bit
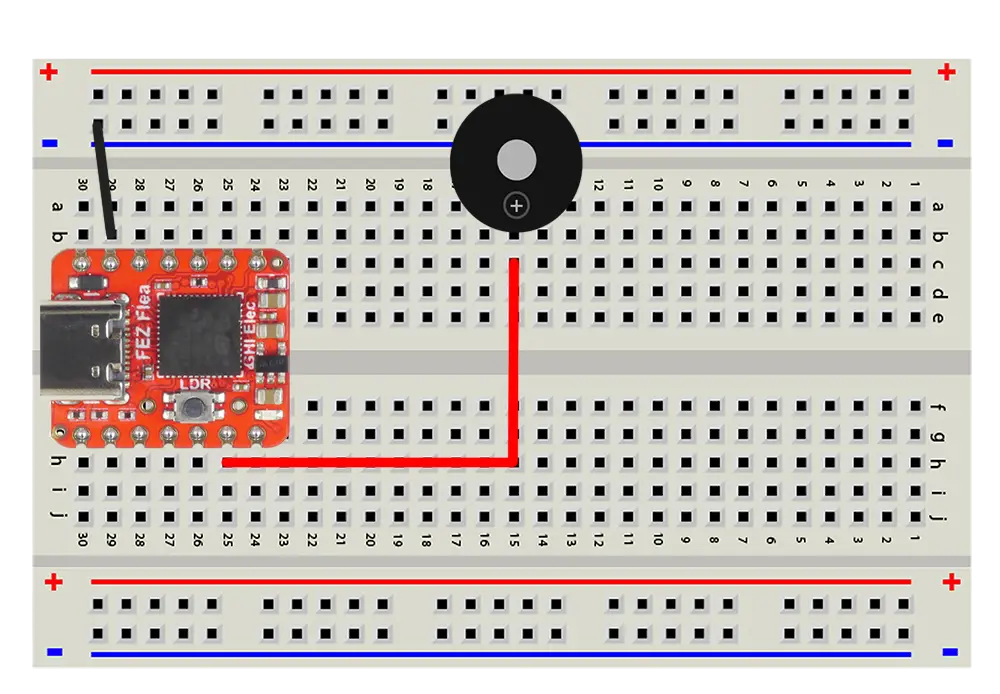
- Push the buzzer into the breadboard, place the + leg into it's own row and connect the other leg into the - rail.
- Connect the leg marked + on the buzzer to PB8 with a pin-to-pin jumper wire.
- Connect GND pin on the Flea to the − rail.
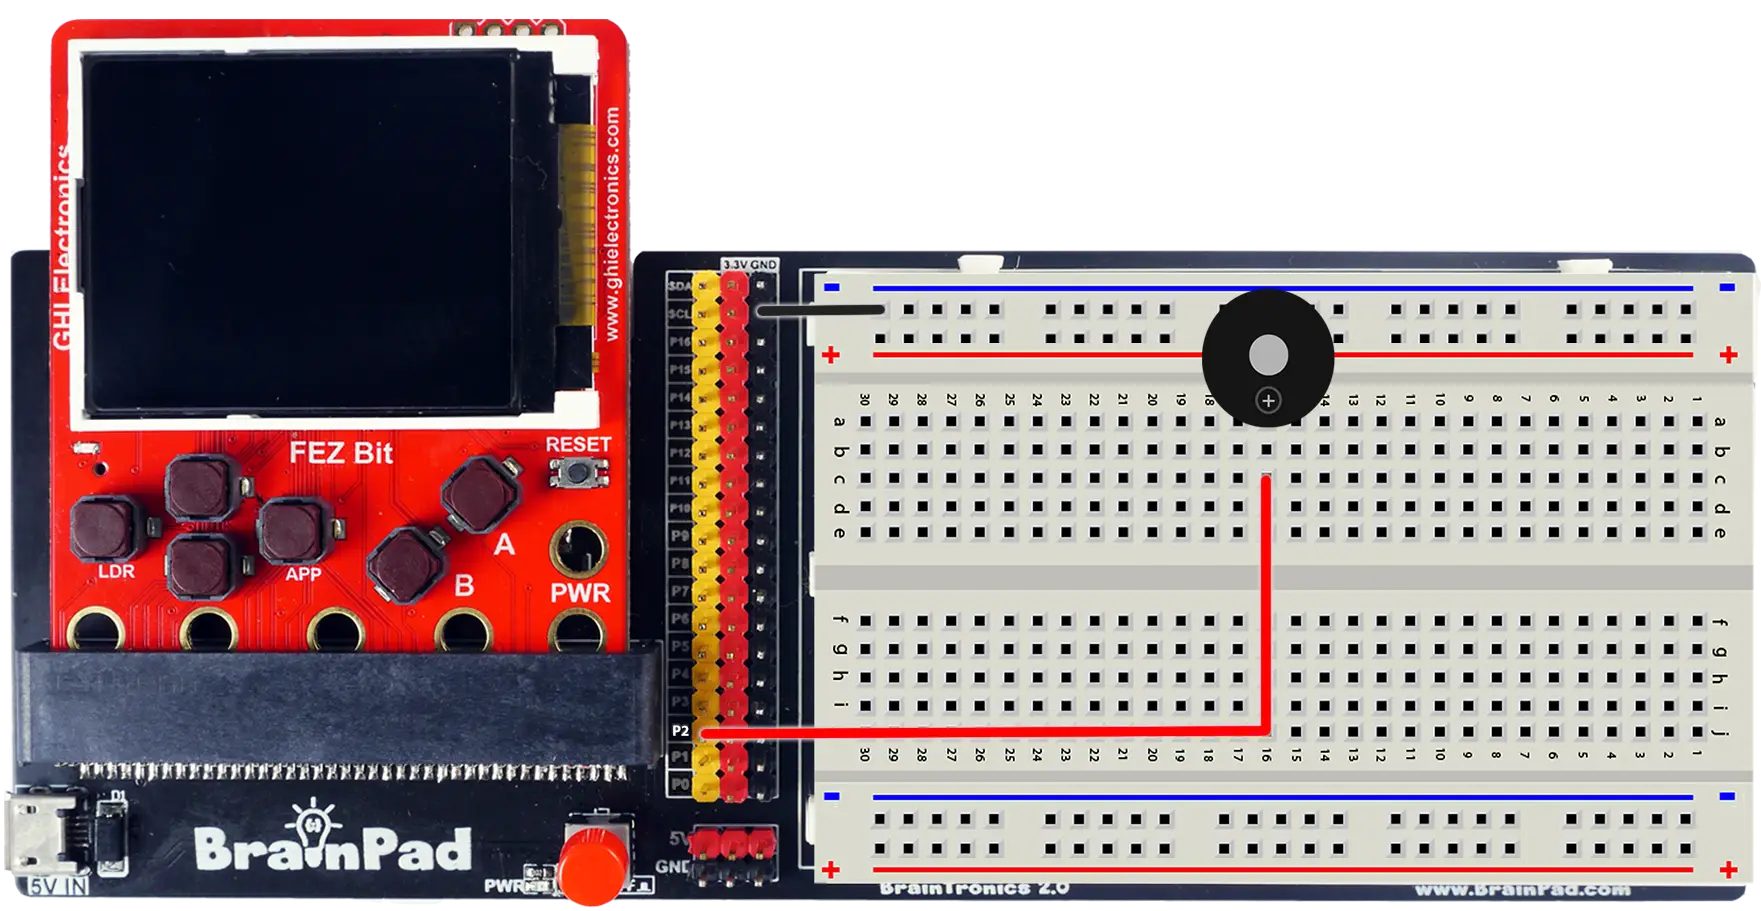
- Push the buzzer into the breadboard, place the + leg into it's own row and connect the other leg into the - rail.
- Connect header pin P2 to the leg marked + on the buzzer with a pin-to-socket jumper wire.
- Connect GND pin on the Bit to the − rail.
Step 3 — Beep
Start with a simple beep: a 1000 Hz tone for a fifth of a second, once a second.
- FEZ Flea
- FEZ Bit
using System.Device.Pwm;
using System.Threading;
using GHIElectronics.TinyCLR.Pins;

using PwmChannel buzzer = PwmChannel.Create(
    FEZFlea.Timer.Pwm.Controller16.Chip,
    FEZFlea.Timer.Pwm.Controller16.PB8,
    1000,   // frequency: 1000 Hz
    0);     // duty cycle: start silent

buzzer.Start();

while (true) {
    buzzer.DutyCycle = 0.5;     // sound on
    Thread.Sleep(200);

    buzzer.DutyCycle = 0;       // sound off
    Thread.Sleep(800);
}
using System.Device.Pwm;
using System.Threading;
using GHIElectronics.TinyCLR.Pins;

using PwmChannel buzzer = PwmChannel.Create(
    FEZBit.Timer.Pwm.Controller5.Chip,
    FEZBit.Timer.Pwm.Controller5.P2,
    1000,   // frequency: 1000 Hz
    0);     // duty cycle: start silent

buzzer.Start();

while (true) {
    buzzer.DutyCycle = 0.5;     // sound on
    Thread.Sleep(200);

    buzzer.DutyCycle = 0;       // sound off
    Thread.Sleep(800);
}
Press F5. Beep … beep … beep.
- A 50% duty cycle pushes the buzzer back and forth evenly — the strongest sound.
- A 0% duty cycle holds the pin low, so the buzzer stops moving and goes quiet. The PWM keeps running, ready for the next beep.
Step 4 — Sweep the pitch
Now change the frequency while the sound plays. This sweeps from a low 200 Hz up to 4000 Hz, like a siren:
buzzer.DutyCycle = 0.5;

while (true) {
    for (int frequency = 200; frequency <= 4000; frequency += 20) {
        buzzer.Frequency = frequency;
        Thread.Sleep(5);
    }
}
Replace the while loop from Step 3 with it, and press F5.
- Higher frequency → higher pitch. The pulses themselves don't change shape — they just come faster.
- Listen for the loud spot. Somewhere in the sweep — often around 2000–4000 Hz — the buzzer gets noticeably louder. That's its resonant frequency, where the piezo disc naturally vibrates most. Many alarms and timers beep at exactly that frequency.
Try the debugger: set a breakpoint on Thread.Sleep(5);. When it stops, the tone keeps sounding — PWM runs on its own, even with your program paused. Hover over frequency to see which pitch you're hearing. (Press F5 quickly if it gets annoying — or remove the breakpoint to let the sweep run.)
Step 5 — Play a melody
Musical notes are just specific frequencies. A melody is a list of notes, each with a duration — two arrays, read in step:
- FEZ Flea
- FEZ Bit
using System.Device.Pwm;
using System.Threading;
using GHIElectronics.TinyCLR.Pins;

using PwmChannel buzzer = PwmChannel.Create(
    FEZFlea.Timer.Pwm.Controller16.Chip,
    FEZFlea.Timer.Pwm.Controller16.PB8,
    1000,
    0);

buzzer.Start();

// Note frequencies in Hz (the octave starting at middle C).
const int C = 262, D = 294, E = 330, F = 349, G = 392, A = 440;

// Note lengths in milliseconds.
const int Quarter = 400, Half = 800;

// Twinkle, Twinkle, Little Star — one note and one length per column.
int[] notes     = { C,       C,       G,       G,       A,       A,       G,
                    F,       F,       E,       E,       D,       D,       C    };
int[] durations = { Quarter, Quarter, Quarter, Quarter, Quarter, Quarter, Half,
                    Quarter, Quarter, Quarter, Quarter, Quarter, Quarter, Half };

while (true) {
    for (int i = 0; i < notes.Length; i++) {
        PlayNote(notes[i], durations[i]);
    }

    Thread.Sleep(2000);
}

void PlayNote(int frequency, int duration) {
    buzzer.Frequency = frequency;
    buzzer.DutyCycle = 0.5;
    Thread.Sleep(duration * 9 / 10);    // sound for most of the note...

    buzzer.DutyCycle = 0;
    Thread.Sleep(duration / 10);        // ...then a short gap, so repeated notes don't blur together
}
using System.Device.Pwm;
using System.Threading;
using GHIElectronics.TinyCLR.Pins;

using PwmChannel buzzer = PwmChannel.Create(
    FEZBit.Timer.Pwm.Controller5.Chip,
    FEZBit.Timer.Pwm.Controller5.P2,
    1000,
    0);

buzzer.Start();

// Note frequencies in Hz (the octave starting at middle C).
const int C = 262, D = 294, E = 330, F = 349, G = 392, A = 440;

// Note lengths in milliseconds.
const int Quarter = 400, Half = 800;

// Twinkle, Twinkle, Little Star — one note and one length per column.
int[] notes     = { C,       C,       G,       G,       A,       A,       G,
                    F,       F,       E,       E,       D,       D,       C    };
int[] durations = { Quarter, Quarter, Quarter, Quarter, Quarter, Quarter, Half,
                    Quarter, Quarter, Quarter, Quarter, Quarter, Quarter, Half };

while (true) {
    for (int i = 0; i < notes.Length; i++) {
        PlayNote(notes[i], durations[i]);
    }

    Thread.Sleep(2000);
}

void PlayNote(int frequency, int duration) {
    buzzer.Frequency = frequency;
    buzzer.DutyCycle = 0.5;
    Thread.Sleep(duration * 9 / 10);    // sound for most of the note...

    buzzer.DutyCycle = 0;
    Thread.Sleep(duration / 10);        // ...then a short gap, so repeated notes don't blur together
}
Press F5. Twinkle, twinkle, little star …
- The arrays line up in columns, just like the colors in RGB LEDs: column
iholds one note and how long to play it. PlayNoteplays each note for 90% of its length, then stays silent for the last 10%. Without the gap, the two C's at the start would merge into one long note.
How it works
From pulses to sound
A piezo buzzer contains a thin ceramic disc that bends slightly whenever a voltage is applied. Each PWM pulse bends it; each gap lets it spring back. That back-and-forth pushes the air — and a regular push on the air, hundreds or thousands of times a second, is sound.
- Frequency → pitch. 262 pushes per second is middle C; 440 is the A that orchestras tune to.
- Duty cycle → strength. At 50%, the push and the spring-back are balanced, giving the strongest sound. Move toward 0% or 100% and the sound gets weaker and thinner.
Notes and octaves
Musical notes follow a simple pattern: doubling a frequency raises the pitch by one octave. A at 440 Hz and A at 880 Hz sound like the "same" note, one higher. Between them, the 12 notes of the scale are spaced evenly by ratio — each one about 6% higher than the last.
| Note | C | D | E | F | G | A | B | C (next octave) |
|---|---|---|---|---|---|---|---|---|
| Hz | 262 | 294 | 330 | 349 | 392 | 440 | 494 | 523 |
Hardware PWM on SITCore covers about 15 Hz to 20 MHz (FEZ Flea) or higher (FEZ Bit) — nearly the whole range of a piano, and well past what a small buzzer can reproduce loudly.
Why the buzzer needs its own controller
Playing a melody means changing frequency constantly — every note. Any other channel on the same controller would change right along with it. For an LED that's invisible; for a servo, which needs a steady 50 Hz, it would send the motor jumping to random positions. Giving the buzzer a controller to itself keeps everything else on the board steady.
Try this
- Doorbell. Wire the button from Digital Input and play a two-note ding-dong each time it's pressed. (Add the
GHIElectronics.TinyCLR.Devices.Gpiopackage.) - Alarm. Alternate quickly between two notes — 800 Hz and 1200 Hz — for a warning siren. Try it at the buzzer's resonant frequency from Step 4 for maximum volume.
- Rests. Add a
Restvalue of0to your notes, and makePlayNotestay silent for that duration instead of playing. - Game sounds. Add sound to the reaction-time game from Digital Input: a high beep when the LED lights, a rising three-note fanfare for the winner, and a low buzz for pressing too early.
- Your own song. Look up the notes for a tune you like and add it as a second pair of arrays. Double a note's frequency to jump up an octave.
Next
Servo Motor — use PWM to move something: position a servo's arm to any angle with precisely timed pulses.
Something not working, or a step unclear? Ask in the TinyCLR forum — we read every post.