Digital Input

Outputs let your code change the world; inputs let the world change your code. In this lesson you'll wire a pushbutton, find out why a button on its own isn't enough, react to presses the efficient way with events — and finish with a two-player reaction-time game.
About 45 minutes.
What you'll learn
- What a digital input reads, and why an unconnected ("floating") input can't be trusted
- How a pull-up resistor fixes that — first with a real resistor, then with the one built into the chip
- The difference between checking a button in a loop (polling) and reacting to it with events
- Why buttons "bounce", and how to filter it out
What you'll need
- The Digital Output circuit. We'll be moving a couple of the pins, consult the appropriate wiring diagram — the LED is reused here
- From the kit:
- 2× pushbuttons
- 1× 27 kΩ resistor — marked
27Kon the paper strip - Jumper wires
First time with these parts?
- LED — the longer leg is the positive side (anode) and goes toward the pin; the shorter leg, next to the flat edge of the rim, goes toward GND. In backwards it just stays dark, so nothing is harmed.
- Resistor — no polarity, so either way round works. The kit's resistors have five bands, while most charts online show four: 220 Ω is red · red · black · black · brown, and 27 kΩ is red · violet · black · red · brown.
220Ron the paper strip means 220 Ω — the letter sits where the decimal point would go.27Kis 27 kΩ.
More in Start Here → Parts you'll meet first.
Pin reference
| Connection | FEZ Flea | FEZ Bit |
|---|---|---|
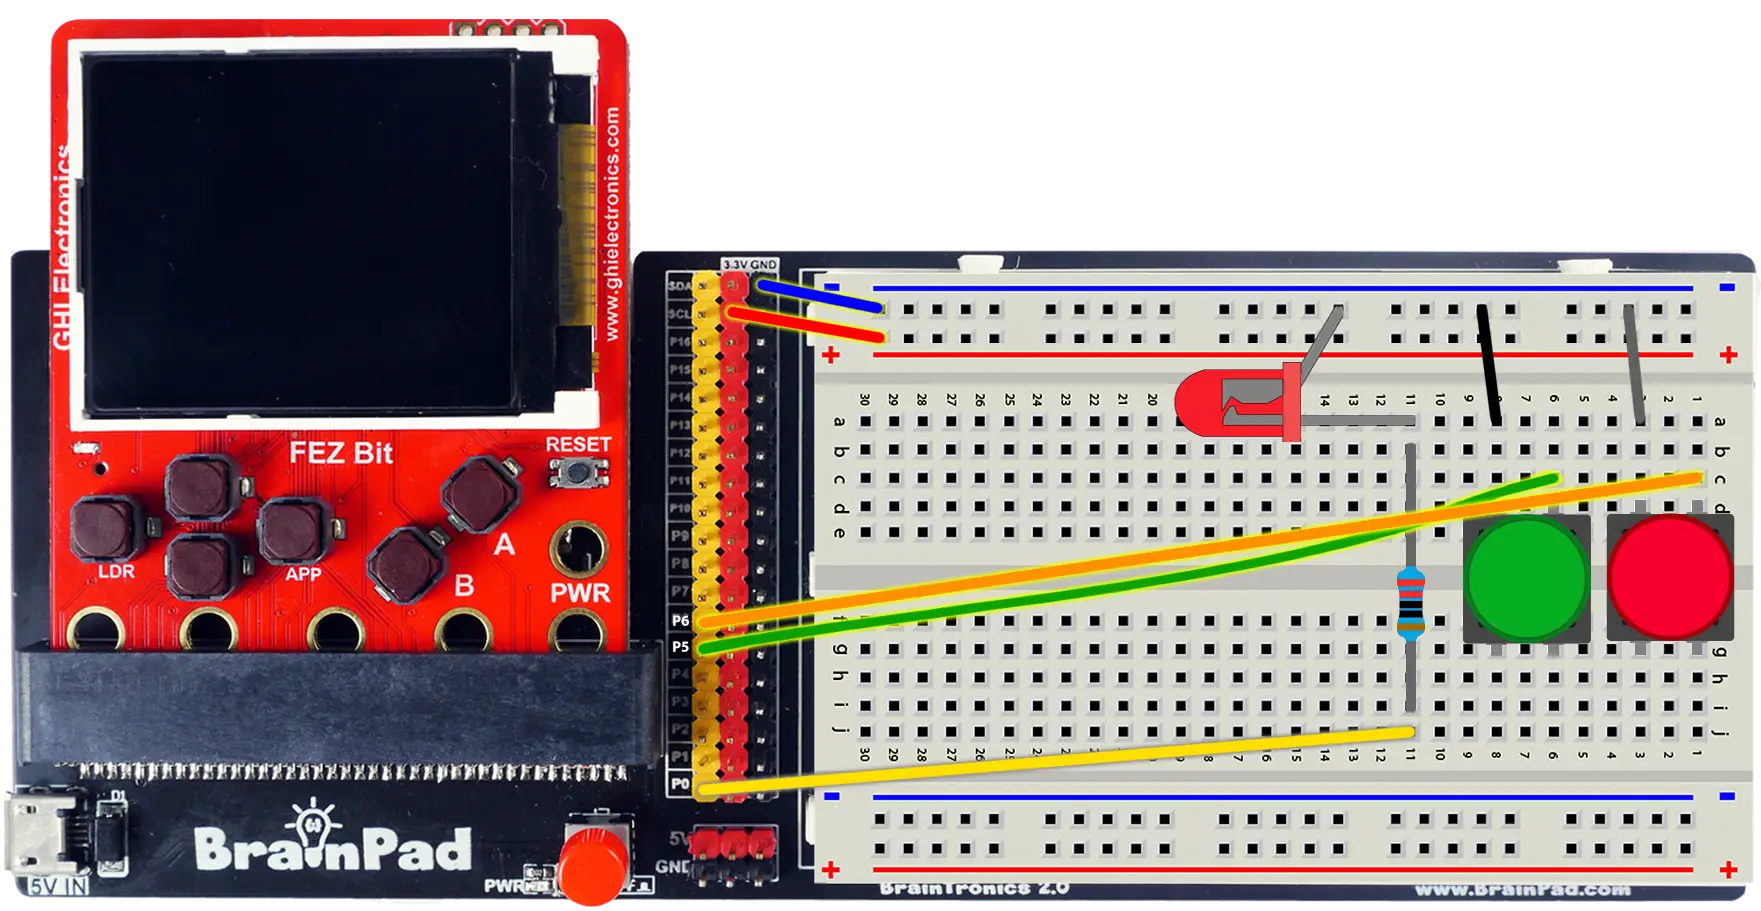
| LED (from Digital Output) | PA3 | P0 |
| Button 1 | PB13 | P5 |
| Button 2 (game) | PB14 | P6 |
| Pull-up resistor power | 3V3 | 3.3V (adapter) |
| Ground | GND | GND |
Step 1 — Create the project
Create a new TinyCLR Application project and install the GHIElectronics.TinyCLR.Devices.Gpio and GHIElectronics.TinyCLR.Pins NuGet packages — the same as Digital Output.
Need the steps? Start Here covers creating a project and deploying.
Step 2 — Wire a button with a pull-up resistor
A pushbutton has four legs connected in pairs inside. Press it, and the two pairs connect to each other. The easy rule: use two diagonally opposite legs — they're always on opposite sides of the switch, whichever way the button is turned.
With USB unplugged:
- FEZ Flea
- FEZ Bit
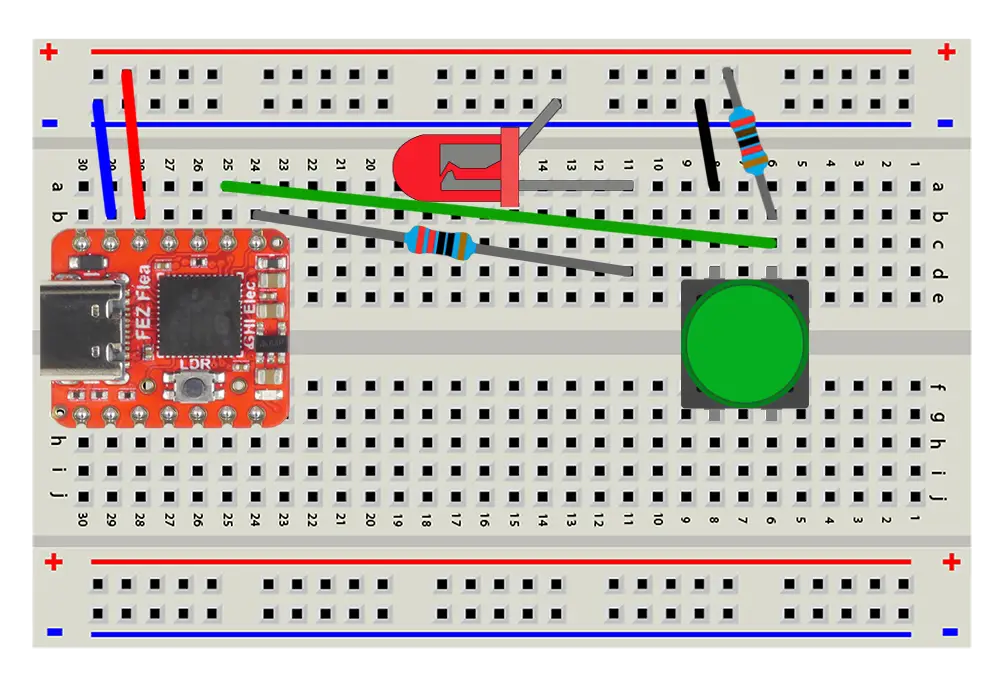
- Power rails. Connect 3V3 to the breadboard's red + rail and GND to the blue − rail with pin-to-pin jumper wires. Later lessons use these rails too.
- Button. Push a button into the breadboard so it straddles the center gap.
- Signal. Connect PB13 to the row of one button leg with a jumper wire.
- Pull-up. Plug the 27 kΩ resistor from that same row to the + rail — either way round, resistors have no polarity.
- Ground. Connect the row of the diagonally opposite button leg to the − rail.
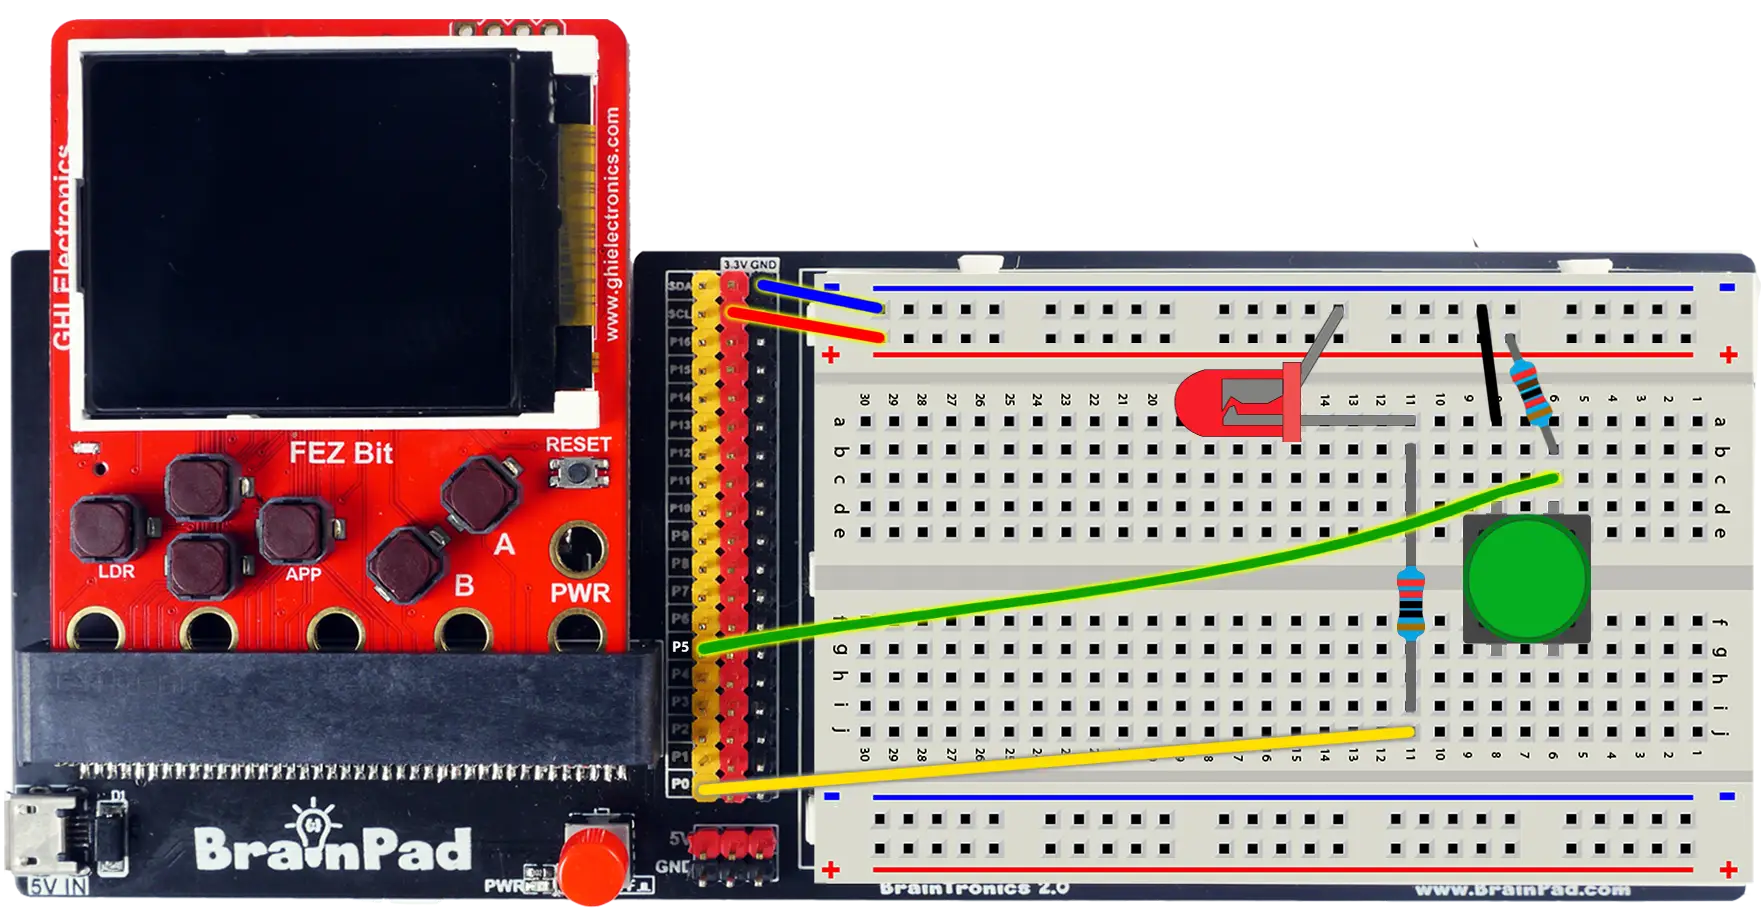
- Power rails. Connect the adapter's 3.3V header pin to the breadboard's red + rail and a GND header pin to the blue − rail with pin-to-socket jumper wires. Later lessons use these rails too.
- Button. Push a button into the breadboard so it straddles the center gap.
- Signal. Connect header pin P5 to the row of one button leg with a pin-to-socket jumper wire.
- Pull-up. Plug the 27 kΩ resistor from that same row to the + rail — either way round, resistors have no polarity.
- Ground. Connect the row of the diagonally opposite button leg to the − rail with a pin-to-pin jumper wire.
3.3V ──── 27 kΩ resistor ────┬──── signal pin
                             │
                           button
                             │
                            GND
The resistor holds the signal pin at 3.3 V (High). Pressing the button connects the pin straight to GND, so it reads Low. Yes, that's backwards from what you might expect: pressed = Low.
Step 3 — Read the button
The simplest way to read a button is to check it over and over in a loop — called polling. This program lights the LED while the button is held down:
- FEZ Flea
- FEZ Bit
using System.Device.Gpio;
using System.Threading;
using GHIElectronics.TinyCLR.Pins;

using GpioController controller = new GpioController();

int ledPin = FEZFlea.GpioPin.PA3;
int buttonPin = FEZFlea.GpioPin.PB13;

controller.OpenPin(ledPin, PinMode.Output);
controller.OpenPin(buttonPin, PinMode.Input);

while (true) {
    bool pressed = controller.Read(buttonPin) == PinValue.Low;

    if (pressed) {
        controller.Write(ledPin, PinValue.High);
    } else {
        controller.Write(ledPin, PinValue.Low);
    }

    Thread.Sleep(10);
}
using System.Device.Gpio;
using System.Threading;
using GHIElectronics.TinyCLR.Pins;

using GpioController controller = new GpioController();

int ledPin = FEZBit.GpioPin.P0;
int buttonPin = FEZBit.GpioPin.P5;

controller.OpenPin(ledPin, PinMode.Output);
controller.OpenPin(buttonPin, PinMode.Input);

while (true) {
    bool pressed = controller.Read(buttonPin) == PinValue.Low;

    if (pressed) {
        controller.Write(ledPin, PinValue.High);
    } else {
        controller.Write(ledPin, PinValue.Low);
    }

    Thread.Sleep(10);
}
Plug in USB and press F5. Hold the button — the LED lights. Let go — it goes dark.
PinMode.Inputmakes the pin an input — the chip doesn't drive it, it only reads the voltage.controller.Read(buttonPin)returnsPinValue.HighorPinValue.Low.Thread.Sleep(10)checks 100 times a second — faster than any finger, while leaving the processor free for other work.
Try the debugger: set a breakpoint on controller.Write(ledPin, PinValue.High); inside the if. The program only stops there while you hold the button. Hover over pressed to confirm it's true, then remove the breakpoint and press F5.
Step 4 — Take away the pull-up
What does the resistor actually do? Find out.
- Stop the program, unplug USB, and remove the 27 kΩ resistor.
- Plug USB back in and press F5 — same code.
- Don't touch the button. Watch the LED — then move your finger near the wire on the signal pin, or touch it.
The LED may flicker, stay on, or stay off — and change when nothing is pressed. With no resistor, the pin isn't connected to anything when the button is up. It's floating: electrically undecided, and easily swayed by static, nearby wires, or your hand. Sometimes it happens to read correctly — which is exactly what makes floating inputs dangerous. The bug shows up later, somewhere else.
The pull-up resistor gives the pin a definite answer when the button isn't pressed.
Step 5 — Use the built-in pull-up
Pull-up resistors are needed so often that the chip has them built in, switchable from code. Leave the 27 kΩ resistor out, and change one line:
controller.OpenPin(buttonPin, PinMode.InputPullUp);
Press F5. The button works reliably again — with one less part on the breadboard.
From here on, the lessons use the built-in pull-ups. The 27 kΩ resistors are still worth keeping in the case: some circuits need a stronger pull-up than the chip provides, or a pull-down, or have a sensor that needs one on its own board.
Step 6 — React with events
Polling works, but it's wasteful: the loop checks the button a hundred times a second even when nobody's touching it, and a busier program might miss a quick press between checks.
Events flip it around. You tell the chip which pin to watch, and it calls your method the instant the pin changes — no loop required. This version turns the LED on when the button goes down, off when it comes up, and counts the presses:
- FEZ Flea
- FEZ Bit
using System.Device.Gpio;
using System.Diagnostics;
using System.Threading;
using GHIElectronics.TinyCLR.Pins;

using GpioController controller = new GpioController();

int ledPin = FEZFlea.GpioPin.PA3;
int buttonPin = FEZFlea.GpioPin.PB13;

controller.OpenPin(ledPin, PinMode.Output);
controller.OpenPin(buttonPin, PinMode.InputPullUp);

int pressCount = 0;

controller.RegisterCallbackForPinValueChangedEvent(
    buttonPin,
    PinEventTypes.Falling | PinEventTypes.Rising,
    OnButtonChanged);

// Nothing else to do — the event does the work.
Thread.Sleep(Timeout.Infinite);

void OnButtonChanged(object sender, PinValueChangedEventArgs args) {
    if (args.ChangeType == PinEventTypes.Falling) {
        // High → Low: pressed.
        controller.Write(ledPin, PinValue.High);
        pressCount++;
        Debug.WriteLine("Presses: " + pressCount);
    } else {
        // Low → High: released.
        controller.Write(ledPin, PinValue.Low);
    }
}
using System.Device.Gpio;
using System.Diagnostics;
using System.Threading;
using GHIElectronics.TinyCLR.Pins;

using GpioController controller = new GpioController();

int ledPin = FEZBit.GpioPin.P0;
int buttonPin = FEZBit.GpioPin.P5;

controller.OpenPin(ledPin, PinMode.Output);
controller.OpenPin(buttonPin, PinMode.InputPullUp);

int pressCount = 0;

controller.RegisterCallbackForPinValueChangedEvent(
    buttonPin,
    PinEventTypes.Falling | PinEventTypes.Rising,
    OnButtonChanged);

// Nothing else to do — the event does the work.
Thread.Sleep(Timeout.Infinite);

void OnButtonChanged(object sender, PinValueChangedEventArgs args) {
    if (args.ChangeType == PinEventTypes.Falling) {
        // High → Low: pressed.
        controller.Write(ledPin, PinValue.High);
        pressCount++;
        Debug.WriteLine("Presses: " + pressCount);
    } else {
        // Low → High: released.
        controller.Write(ledPin, PinValue.Low);
    }
}
Press F5 and press the button a few times, watching the Output window.
- Falling is the pin going High → Low — with a pull-up, that's a press. Rising is Low → High — a release.
Thread.Sleep(Timeout.Infinite)keeps the program alive while doing nothing. The event handler still runs whenever the button changes.
Try the debugger: set a breakpoint on pressCount++;. Nothing happens until you press the button — then the board stops, right inside the event handler. Nothing in your code calls this method; the pin change did. Remove the breakpoint and press F5 to continue.
Step 7 — Filter out bounce
Keep pressing the button and watch the count. Every so often, one press counts as two or three.
That's switch bounce. Inside the button, metal contacts slam together and physically bounce apart a few times before settling — all within a few milliseconds. Too fast for you to see, but not too fast for an event.
The fix is to debounce: after accepting a change, ignore any more changes for a short time. 50 ms is far longer than the bounce, and far shorter than any human double-press. Replace the event handler with:
long lastChangeTicks = 0;

void OnButtonChanged(object sender, PinValueChangedEventArgs args) {
    long now = DateTime.Now.Ticks;

    // Ignore anything within 50 ms of the last accepted change — that's bounce.
    if (now - lastChangeTicks < 50 * TimeSpan.TicksPerMillisecond) {
        return;
    }
    lastChangeTicks = now;

    if (args.ChangeType == PinEventTypes.Falling) {
        controller.Write(ledPin, PinValue.High);
        pressCount++;
        Debug.WriteLine("Presses: " + pressCount);
    } else {
        controller.Write(ledPin, PinValue.Low);
    }
}
Add using System; at the top for DateTime and TimeSpan, and move the long lastChangeTicks = 0; line up next to int pressCount = 0;. Press F5 — now every press counts exactly once.
Step 8 — Build a reaction-time game
Time to put it together. Two players each get a button. After a random wait, the LED lights — first to press wins, and the Output window shows their reaction time. Press before the LED lights, and you lose the round.
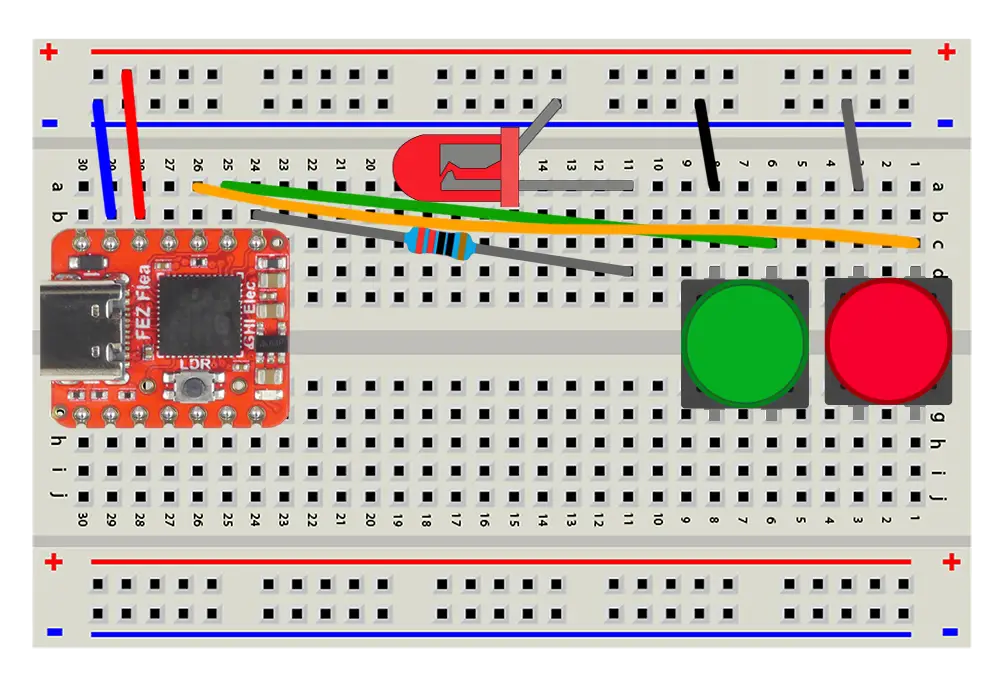
Wire the second button the same way as the first — straddling the center gap, one leg to PB14 (FEZ Flea) or P6 (FEZ Bit), the diagonal leg to the − rail. No resistor needed: both buttons use the built-in pull-ups.
- FEZ Flea
- FEZ Bit
using System;
using System.Device.Gpio;
using System.Diagnostics;
using System.Threading;
using GHIElectronics.TinyCLR.Pins;

using GpioController controller = new GpioController();

int ledPin = FEZFlea.GpioPin.PA3;
int player1Pin = FEZFlea.GpioPin.PB13;
int player2Pin = FEZFlea.GpioPin.PB14;

controller.OpenPin(ledPin, PinMode.Output);
controller.OpenPin(player1Pin, PinMode.InputPullUp);
controller.OpenPin(player2Pin, PinMode.InputPullUp);

var random = new Random();
var roundLock = new object();

bool ledOn = false;
long ledOnTicks = 0;
int winner = 0;     // 0 = round not decided yet

controller.RegisterCallbackForPinValueChangedEvent(player1Pin, PinEventTypes.Falling, OnButtonPressed);
controller.RegisterCallbackForPinValueChangedEvent(player2Pin, PinEventTypes.Falling, OnButtonPressed);

while (true) {
    // New round: LED off, nobody has won.
    lock (roundLock) {
        controller.Write(ledPin, PinValue.Low);
        ledOn = false;
        winner = 0;
    }
    Debug.WriteLine("Get ready...");

    // Wait a random 2–5 seconds so nobody can predict it.
    Thread.Sleep(2000 + random.Next(3000));

    lock (roundLock) {
        if (winner == 0) {          // Skip if someone jumped the gun.
            controller.Write(ledPin, PinValue.High);
            ledOnTicks = DateTime.Now.Ticks;
            ledOn = true;
        }
    }

    // Give the players time to press, then start the next round.
    Thread.Sleep(3000);
}

void OnButtonPressed(object sender, PinValueChangedEventArgs args) {
    lock (roundLock) {
        if (winner != 0) {
            return;                 // Round already decided — also swallows bounce.
        }

        int player = args.PinNumber == player1Pin ? 1 : 2;

        if (!ledOn) {
            winner = player == 1 ? 2 : 1;
            Debug.WriteLine("Player " + player + " pressed too early! Player " + winner + " wins.");
        } else {
            winner = player;
            long reactionMs = (DateTime.Now.Ticks - ledOnTicks) / TimeSpan.TicksPerMillisecond;
            Debug.WriteLine("Player " + player + " wins in " + reactionMs + " ms!");
        }
    }
}
using System;
using System.Device.Gpio;
using System.Diagnostics;
using System.Threading;
using GHIElectronics.TinyCLR.Pins;

using GpioController controller = new GpioController();

int ledPin = FEZBit.GpioPin.P0;
int player1Pin = FEZBit.GpioPin.P5;
int player2Pin = FEZBit.GpioPin.P6;

controller.OpenPin(ledPin, PinMode.Output);
controller.OpenPin(player1Pin, PinMode.InputPullUp);
controller.OpenPin(player2Pin, PinMode.InputPullUp);

var random = new Random();
var roundLock = new object();

bool ledOn = false;
long ledOnTicks = 0;
int winner = 0;     // 0 = round not decided yet

controller.RegisterCallbackForPinValueChangedEvent(player1Pin, PinEventTypes.Falling, OnButtonPressed);
controller.RegisterCallbackForPinValueChangedEvent(player2Pin, PinEventTypes.Falling, OnButtonPressed);

while (true) {
    // New round: LED off, nobody has won.
    lock (roundLock) {
        controller.Write(ledPin, PinValue.Low);
        ledOn = false;
        winner = 0;
    }
    Debug.WriteLine("Get ready...");

    // Wait a random 2–5 seconds so nobody can predict it.
    Thread.Sleep(2000 + random.Next(3000));

    lock (roundLock) {
        if (winner == 0) {          // Skip if someone jumped the gun.
            controller.Write(ledPin, PinValue.High);
            ledOnTicks = DateTime.Now.Ticks;
            ledOn = true;
        }
    }

    // Give the players time to press, then start the next round.
    Thread.Sleep(3000);
}

void OnButtonPressed(object sender, PinValueChangedEventArgs args) {
    lock (roundLock) {
        if (winner != 0) {
            return;                 // Round already decided — also swallows bounce.
        }

        int player = args.PinNumber == player1Pin ? 1 : 2;

        if (!ledOn) {
            winner = player == 1 ? 2 : 1;
            Debug.WriteLine("Player " + player + " pressed too early! Player " + winner + " wins.");
        } else {
            winner = player;
            long reactionMs = (DateTime.Now.Ticks - ledOnTicks) / TimeSpan.TicksPerMillisecond;
            Debug.WriteLine("Player " + player + " wins in " + reactionMs + " ms!");
        }
    }
}
Press F5, grab a friend, and watch the Output window.
- Both buttons share one handler.
args.PinNumbertells you which button fired it. - The main loop and the event handler run at the same time, on different threads. The
lockmakes sure they never changeledOnandwinnerhalfway through each other's work. - No separate debounce needed. Once a round has a winner, every other press — including bounces — is ignored until the next round.
How it works
Digital input
An input pin doesn't drive a voltage — it measures one. A voltage near 3.3 V reads as High; near 0 V reads as Low. In between, or with nothing connected, the result is unpredictable.
Pull-up and pull-down resistors
A button can only make a connection — it can't provide a voltage when it's open. A pull-up resistor provides that default:
- Button up: the resistor connects the pin to 3.3 V → High.
- Button down: the button connects the pin directly to GND. It wins over the resistor, because the resistor limits how hard it pulls → Low.
With the button pressed, current flows from 3.3 V through the resistor to GND. A large value keeps that current tiny:
current = 3.3 V ÷ 27,000 Ω ≈ 0.12 mA
A pull-down is the mirror image: the resistor connects the pin to GND, the button connects it to 3.3 V, and pressed reads High. The chip has built-in pull-downs too — PinMode.InputPullDown.
Polling vs. events
| Polling | Events | |
|---|---|---|
| How | Check the pin in a loop | The chip calls your method when the pin changes |
| Good for | Simple programs, or reading a value at a steady rate | Buttons, and anything that happens occasionally |
| Cost | Uses processor time even when nothing changes | Costs nothing until something happens |
| Risk | Misses changes shorter than the loop delay | Sees every change — including bounce |
Try this
- Toggle. Make each press flip the LED — press once for on, again for off. (You'll need the debounce from Step 7.)
- Four players. Wire the other two buttons to PB15 and PA0 (FEZ Flea) or P7 and P8 (FEZ Bit), and extend the game to four players.
- High score. Keep the fastest reaction time across rounds and print "New record!" when it's beaten. Pause the debugger between rounds and hover over your variable to check it.
- Pull-down. Rewire one button with the 27 kΩ resistor to GND and the button to 3.3V. Change the pin to
PinMode.Inputand flip your logic — pressed is now High, and a press is a Rising event.
Next
Breathing LED — go beyond on and off: fade an LED smoothly with pulse-width modulation.
Something not working, or a step unclear? Ask in the TinyCLR forum — we read every post.