TLS Server
A TLS server accepts incoming encrypted connections — useful for hosting a secure web UI, a local REST API, or any other inbound TLS endpoint on the device. TinyCLR's TLS 1.2 implementation runs entirely inside SITCore's secure memory; see TLS for the overall design.
NuGet package: GHIElectronics.TinyCLR.Devices.Network.
You'll need a server certificate and private key loaded on the device. For development, a self-signed certificate works fine; for production, use one signed by a real CA (or your own internal CA, as shown below).
Generating a self-signed certificate
There are many ways to produce a certificate. The flow below uses OpenSSL to create a CA certificate plus a server certificate signed by that CA. The advantage of generating a CA first is that client PCs only need to trust the CA — every certificate you sign with it after that is automatically trusted, which is much easier than installing each server cert individually.
You'll need three OpenSSL config files. Create them next to where you'll run the commands.
ca.cnf — CA certificate config:
[req]
prompt = no
distinguished_name = req_distinguished_name

[req_distinguished_name]
C = US
ST = MYSTATE
L = MYLOCALITY
O = MYORGANIZATION
server.cnf — server certificate config:
[req]
default_bits = 2048
prompt = no
default_md = sha256
distinguished_name = req_distinguished_name

[req_distinguished_name]
C = US
ST = MYSTATE
L = MYLOCALITY
O = MYORGANIZATION
CN = SCM20260D
server_v3.ext — server certificate extensions (TLS clients require Subject Alternative Names in modern verifiers):
authorityKeyIdentifier=keyid,issuer
basicConstraints=CA:FALSE
keyUsage = digitalSignature, nonRepudiation, keyEncipherment, dataEncipherment
subjectAltName = @alt_names

[alt_names]
DNS.1 = SCM20260D
IP.1 = 192.168.0.109
Build the CA
Update the C/ST/L/O fields in ca.cnf, then generate a CA private key and a 10-year CA certificate:
openssl genrsa -out ca_privatekey.pem 2048
openssl req -new -x509 -days 3650 -nodes -key ca_privatekey.pem -sha256 -out ca.crt -config ca.cnf
ca.crt is what you'll publish and install in trust stores. Keep ca_privatekey.pem secret.
Build the server certificate
Update server.cnf and server_v3.ext to match the CN (the FQDN, NetBIOS name, or IP address of the device) and the alt_names section (every DNS name or IP the device might be reached as).
Generate the server CSR and sign it with the CA for 1-year validity:
openssl req -new -nodes -out server.csr -keyout serverkey.key -config server.cnf
openssl x509 -req -in server.csr -CA ca.crt -CAkey ca_privatekey.pem -CAcreateserial -out servercert.crt -days 365 -extfile server_v3.ext
You now have:
servercert.crt— the server certificateserverkey.key— the server's private key
Embed both as resources in your TinyCLR project.
Installing the CA on a client PC
Once the CA is trusted by a PC, any server certificate signed by it (current and future) is automatically trusted on that PC.
-
Double-click
ca.crtand click Install Certificate…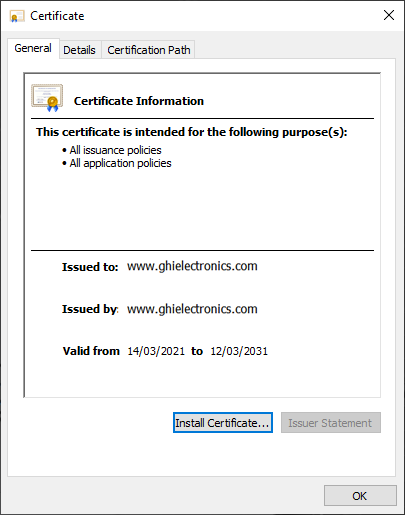
-
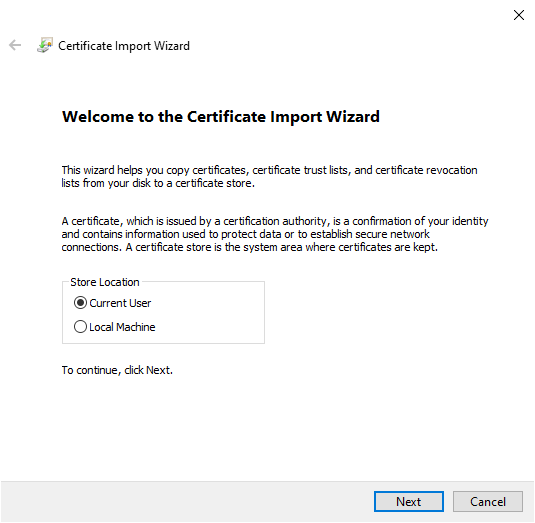
Select Current User as the store location.
-
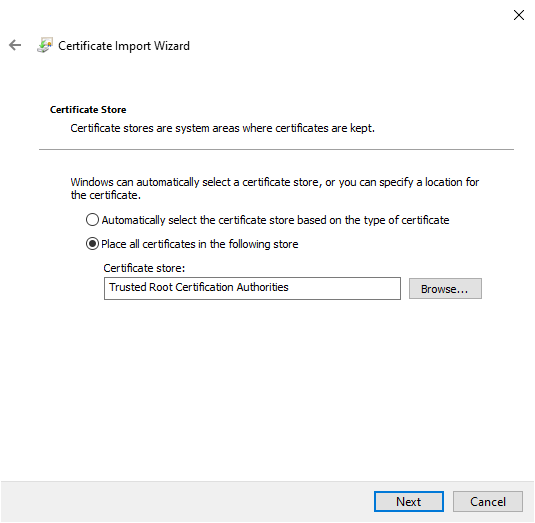
Choose Place all certificates in the following store → Browse → Trusted Root Certification Authorities.
-
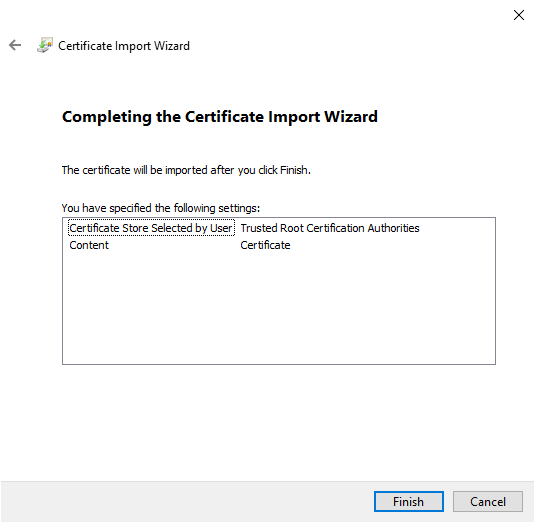
Confirm and finish. The PC now trusts every certificate signed by your CA.
Removing the CA later
To uninstall the CA from a Windows machine:
-
Run
certmgr.msc(or search "Manage user certificates" in Settings) — make sure you open the Current User store, not Local Computer.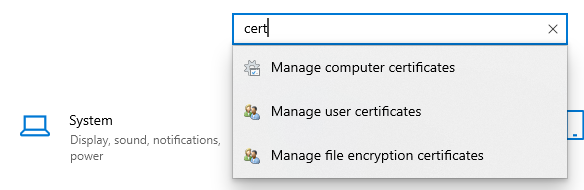
-
Expand Trusted Root Certification Authorities → Certificates, find your CA by the
C/ST/L/Ovalues fromca.cnf, and delete it.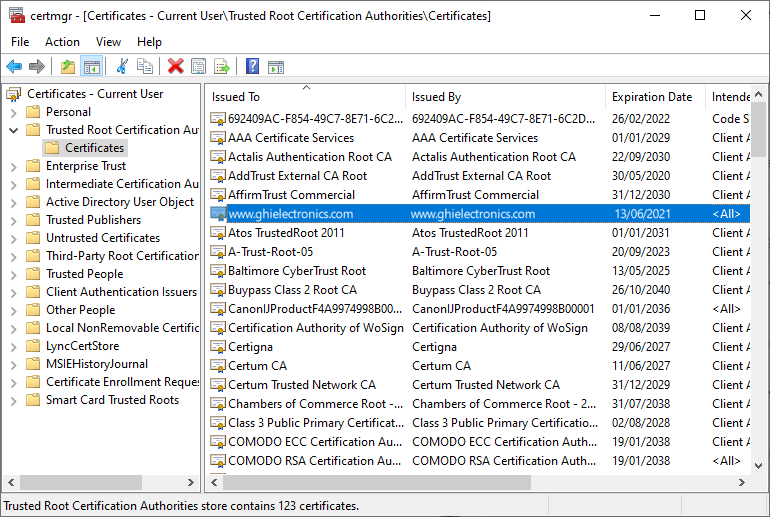
Loading the certificate on the device
Embed servercert.crt and serverkey.key as resources in your TinyCLR project, then load them into an X509Certificate:
using GHIElectronics.TinyCLR.Native;
using System.Security.Cryptography.X509Certificates;

byte[] serverCertBytes = Resources.GetBytes(Resources.BinaryResources.servercert);

var certificate = new X509Certificate(serverCertBytes) {
    PrivateKey = Resources.GetBytes(Resources.BinaryResources.serverkey),
};
Accepting a TLS connection
Wrap an accepted Socket (or its NetworkStream) in an SslStream and call AuthenticateAsServer to perform the handshake:
using System.Net.Security;
using System.Net.Sockets;
using System.Security.Authentication;

// `socket` is the accepted TCP connection from your listener.
using var sslStream = new SslStream(socket);

try {
    sslStream.AuthenticateAsServer(certificate, SslProtocols.Tls12);
}
catch (InvalidOperationException ex) {
    // Handshake failed — log, close, and accept the next connection.
    return;
}

// Read and write encrypted data through sslStream as a regular Stream.
byte[] buffer = new byte[1024];
int bytesRead = sslStream.Read(buffer, 0, buffer.Length);
sslStream.Write(buffer, 0, bytesRead);
For more on OpenSSL, see openssl.org.
API reference
| Namespace | Description |
|---|---|
| GHIElectronics.TinyCLR.Devices.Network | Network interface controller (TLS server setup) |