Displays
TinyCLR supports three kinds of displays. The first two are graphical (drawn using the graphics engine); the third is text-only.
- Native displays — parallel RGB TFTs driven directly by the SITCore's DMA. Highest performance, but require lots of RAM for the framebuffer.
- Virtual displays — serial (SPI or I²C) displays where the driver pushes pixel data over the bus. Lower bandwidth, lower RAM requirement.
- Character displays — text-only HD44780-style LCDs. No graphics engine; just GPIO.
The pages of this section split as follows: this page covers configuring the display itself (timing, wiring, enabling). The graphics engine covers drawing on it.
NuGet packages: GHIElectronics.TinyCLR.Devices.Display, GHIElectronics.TinyCLR.Devices.Gpio, GHIElectronics.TinyCLR.Pins, plus GHIElectronics.TinyCLR.Drawing if you're using the graphics engine.
Native displays
Parallel RGB displays connect to dedicated pins on the SITCore. The display controller uses DMA to refresh the panel automatically and continuously from a framebuffer in RAM — no CPU involvement, no per-frame work in your application. You just write to the framebuffer, and the panel updates.
The trade-off is RAM. An 800×480 panel at 16 bpp needs 800 × 480 × 2 = 768 KB of framebuffer — well within range for SITCore SoMs with external SDRAM, much tighter on bare SoCs.
The example below targets the SCM20260D Dev Board with a 4.3" parallel display. It powers up the backlight, configures the panel timing, and enables the display — at that point a displayController is ready for the graphics engine or for low-level direct access.
using GHIElectronics.TinyCLR.Devices.Display;
using GHIElectronics.TinyCLR.Devices.Gpio;
using GHIElectronics.TinyCLR.Pins;

var backlight = GpioController.GetDefault().OpenPin(SC20260.GpioPin.PA15);
backlight.SetDriveMode(GpioPinDriveMode.Output);
backlight.Write(GpioPinValue.High);

var displayController = DisplayController.GetDefault();

// 4.3" panel timing — see your panel datasheet for the exact values.
displayController.SetConfiguration(new ParallelDisplayControllerSettings {
    Width = 480,
    Height = 272,
    DataFormat = DisplayDataFormat.Rgb565,
    Orientation = DisplayOrientation.Degrees0,
    PixelClockRate = 10_000_000,
    PixelPolarity = false,
    DataEnablePolarity = false,
    DataEnableIsFixed = false,
    HorizontalFrontPorch = 2,
    HorizontalBackPorch = 2,
    HorizontalSyncPulseWidth = 41,
    HorizontalSyncPolarity = false,
    VerticalFrontPorch = 2,
    VerticalBackPorch = 2,
    VerticalSyncPulseWidth = 10,
    VerticalSyncPolarity = false,
});

// Enable() turns on the display I/O and starts the automatic refresh.
displayController.Enable();
Now pass displayController.Hdc to the graphics engine — see Graphics for the drawing API.
7" display configuration
Same code, different timing — replace the SetConfiguration block above with:
displayController.SetConfiguration(new ParallelDisplayControllerSettings {
    Width = 800,
    Height = 480,
    DataFormat = DisplayDataFormat.Rgb565,
    Orientation = DisplayOrientation.Degrees0,
    PixelClockRate = 24_000_000,
    PixelPolarity = false,
    DataEnablePolarity = false,
    DataEnableIsFixed = false,
    HorizontalFrontPorch = 16,
    HorizontalBackPorch = 46,
    HorizontalSyncPulseWidth = 1,
    HorizontalSyncPolarity = false,
    VerticalFrontPorch = 7,
    VerticalBackPorch = 23,
    VerticalSyncPulseWidth = 1,
    VerticalSyncPolarity = false,
});
Virtual displays
Virtual displays render into a RAM bitmap; when Flush is called on the graphics engine, an event fires with the pixel data to push to the panel — over SPI, I²C, a network socket, or any other transport. Slower than DMA-driven parallel, but works on smaller chips and on transports that don't have a dedicated controller.
The example below sets up an ST7735 SPI display on an SC20100S Dev Board — the driver's DrawBuffer method is what the graphics engine's flush event hands off to.
NuGet packages: also add GHIElectronics.TinyCLR.Devices.Spi and GHIElectronics.TinyCLR.Drivers.Sitronix.ST7735.
using System.Drawing;
using GHIElectronics.TinyCLR.Devices.Gpio;
using GHIElectronics.TinyCLR.Devices.Spi;
using GHIElectronics.TinyCLR.Drivers.Sitronix.ST7735;
using GHIElectronics.TinyCLR.Pins;

const int SCREEN_WIDTH = 160;
const int SCREEN_HEIGHT = 128;

var spi = SpiController.FromName(SC20100.SpiBus.Spi4);
var gpio = GpioController.GetDefault();

var st7735 = new ST7735Controller(
    spi.GetDevice(ST7735Controller.GetConnectionSettings(SpiChipSelectType.Gpio, gpio.OpenPin(SC20100.GpioPin.PD10))),  // CS
    gpio.OpenPin(SC20100.GpioPin.PC4),       // RS
    gpio.OpenPin(SC20100.GpioPin.PE15)       // RESET
);

var backlight = gpio.OpenPin(SC20100.GpioPin.PA15);
backlight.SetDriveMode(GpioPinDriveMode.Output);
backlight.Write(GpioPinValue.High);

st7735.SetDataAccessControl(true, true, false, false);
st7735.SetDrawWindow(0, 0, SCREEN_WIDTH - 1, SCREEN_HEIGHT - 1);
st7735.Enable();

// Route the graphics engine's flush events to the ST7735.
Graphics.OnFlushEvent += (sender, data, x, y, width, height, originalWidth) =>
    st7735.DrawBuffer(data);
See Graphics for the drawing portion — render into a Bitmap via Graphics.FromImage(...) and call Flush to push to the ST7735.
The Extended Features → Display drivers page lists the other supported virtual-display controllers (ST7789, ERC12864, ILI9341, SSD1306, SSD1351). They follow the same pattern — instantiate the controller, wire Graphics.OnFlushEvent, draw.
Character displays
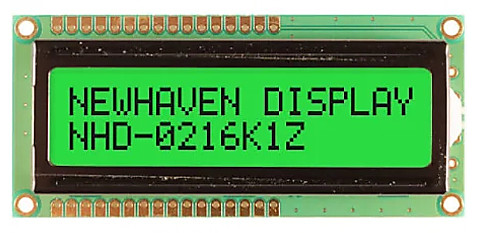
Character LCDs (the classic blue or green segmented displays) use the HD44780 controller — a chip that's been the standard for decades. They display only text in a fixed grid (commonly 16×2 or 20×4 characters), and they're driven entirely from GPIO pins — no SPI, no I²C, no graphics engine.
A complete HD44780 driver is in the TinyCLR-Samples repository. Drop the file into your project and use it like this:
using GHIElectronics.TinyCLR.Devices.Gpio;
using GHIElectronics.TinyCLR.Pins;

// HD44780 wired with 4-bit data + RS and Enable control lines.
var gpio = GpioController.GetDefault();
var lcd = new HD44780(
    rs:     gpio.OpenPin(SC20100.GpioPin.PA0),
    enable: gpio.OpenPin(SC20100.GpioPin.PA1),
    d4:     gpio.OpenPin(SC20100.GpioPin.PA2),
    d5:     gpio.OpenPin(SC20100.GpioPin.PA3),
    d6:     gpio.OpenPin(SC20100.GpioPin.PA4),
    d7:     gpio.OpenPin(SC20100.GpioPin.PA5)
);

lcd.Initialize(rows: 2, columns: 16);
lcd.Clear();
lcd.Print("Hello World!");
lcd.SetCursor(row: 1, column: 0);
lcd.Print("TinyCLR ready");
The HD44780 spec hasn't changed in years, so the driver should work as-is across SITCore boards — adjust the pin assignments to match your wiring.
Low-level access
TinyCLR also exposes a low-level API in GHIElectronics.TinyCLR.Devices.Display for writing raw pixel data directly to a native display, without going through the graphics engine. Useful when you want to skip System.Drawing, avoid embedding font resources, or write a custom rendering pipeline.
The low-level API is for advanced cases only. For typical applications, use the graphics engine — it's simpler, has shape and text primitives, and integrates with fonts and image decoders.
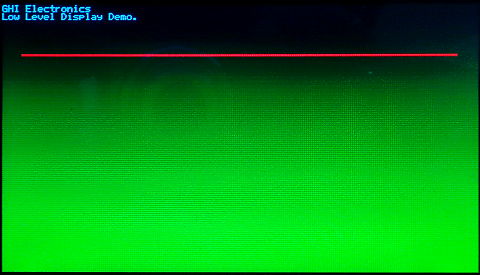
The example below assumes the display has been set up using the native display configuration above (SC20260D 4.3"). It paints a gradient with DrawBuffer, draws built-in characters via DrawString, and sets individual pixels via DrawPixel.
// Fill a buffer with a stripe gradient.
byte[] picture = new byte[480 * 272 * 2];
for (var i = 0; i < picture.Length; i++) {
    picture[i] = (byte)(((i % 2) == 0) ? ((i / 4080) & 0b00000111) << 5 : i / 32640);
}

displayController.DrawString("\f");                                  // Clear text layer.
displayController.DrawBuffer(0, 0, 0, 0, 480, 272, 480, picture, 0);
displayController.DrawString("GHI Electronics\n");
displayController.DrawString("Low-level display demo.");

// Draw a 2-pixel-thick red bar.
for (var x = 20; x < 459; x++) {
    displayController.DrawPixel(x, 50, 0xF800);     // 0xF800 = pure red in RGB565.
    displayController.DrawPixel(x, 51, 0xF800);
}
Result on the 4.3" panel:
API reference
| Namespace | Description |
|---|---|
| GHIElectronics.TinyCLR.Devices.Display | Display controller for parallel and SPI displays |